Gman
Ram Guru
When I was shopping for my truck in the US, the only options were 26 and 33. The 'Classic' 1500 had an option for 23.
27.4 imperial gallons = 33 US gallons, more or less. Are you in Canada?
Thank you for posting this. I purchased the new canister and lines that go with it. They should be here soon. I will be reading and rereading your post very thoroughly as a reference.Alright so heres what has to be done. I dont have pics for everything as I was one man'ing this for the most part except when i needed help to get the 33gal tank up.
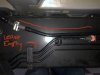
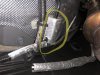
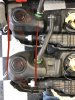
8179 picture attached - You need to remove that entire plastic cover that is holding what looks like two metal brake lines, the main fuel line itself, and then a vapor return line (vapor one is thickest one). There are four clips that hold that cover, the clips are tricky but get to it from the back side of the clip and it pops out from the front. Then finagle it to get out. Then whats circled, thats the vapor return going to the tank, disconnect that quick connect, and also to the right there is another quick connect for the main fuel supply line, disconnect that, be careful some fuel will come out, not a ton, maybe a few ounces.
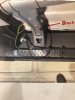
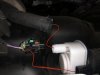
8180 - In this pic you need to slide back the large heat insulation and disconnect that vapor tube fitting, the entire fuel system from the tank, lines, vapor tubes all use this style of quick connect style fittings, you just need to pull up on the plastic clip and then push on the back side and slide it out.
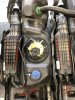
8181 - Ok so this is a picture of the canister end itself, you need to get the rubber hose off the canister, it will take some to break it loose. I basically took a plier and lightly grabbed the hose to turn it so it initially breaks free. Then using a screw driver pushed it out. Then also remove the plug too next to it. I had the back of my car up on ramps so i was able to basically sit up and see this and disconnect it.
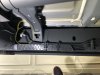
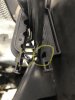
8182 - This is out of order in flow, but wanted to show a detailed pic of the two clips near the front of the car (near the cat and where you need to remove the connection for whats in the pic 8180). Notice how that clip works. Dont just go prying it out, you will snap the clip that latches in. I basically took a fine flat or a dental pick to jam it into the back side to bend the clip and then a flat screwdriver at the bottom to split it open.
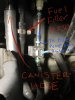
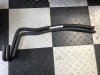
8183 - This one is a pic look up to where the fuel is filled but back side of the fender. You need to really just remove the two hoses in red text, the main filler hose, then the rubber canister hose. The vapor line with the plug that i wrote in blue text, you really dont need to remove, you can if you like (I did but turns out dont need to).
Then really you need to stick your arm above the frame rail (follow the vapor rubber hose in 8183 you just disconnected), you should feel the top of the fuel pump, I basically blindly by feel found the 4pin plug harness, popped it off, pretty easy. Then through some patience i was able to disconnect the vapor hose (the other end of what i said dont need to disconnect in 8183). All you need to do is with your fingers pop the outside of the pull tab up on the quick connect fitting and then slightly twist it and put some pressure on the bottom part of it to allow you to release the quick connect and pull. Now essentially you have what you need disconnected from the top of the tank EXCEPT the main fuel supply line, now you already disconnected it the other end on 8179. If you can you could also blindly feel for that quick connect and disconnect it just like you did the vapor one here. Its tricky but i managed to do it, you dont have to as you can drop the tank with that connected if you cant get to it or fingers too fat.
At this point just remove the two bolts that hold the tank straps, and get the tank down. Then really reverse the order. I had to swap my fuel pump which Im assuming most of you all will need to as well who attempt this, so get that done. Then make sure all the vapor hoses are on the 33gal tank and connected. Canister ready. Then get the new tank up with a buddy, almost impossible without a buddy, cause one needs to help keep the fuel filler hose pushed over the frame rail while you both lift it up in place and then get the straps on and bolts started. Then reconnect the hoses, i again just stuck my hands over the rail and just got the 4pin plug connected and quick connects connected to fuel pump. Then get the main fuel supply line reconnected and posited back on the frame rail, and then get that damn cover that covers up the lines back on, enjoy wrestling to get that on. Then double check you got it all clipped up, connected, lines plugs. I then cycled the ON a few times to get the pump primed and lines primed, and it fired right up (obviously after you fill some fuel in the tank), checked for leaks, seemed good. Reprogrammed with AlfaOBD to set it to 125liters Fuel Capacity and we ready to roll.
8185 - Im simply showing that the top vapor line along the frame rail you removed is what your 26gal needed. The new 33gal needs the bottom one, notice its a decent foot and half shorter cause tank is that much longer.
8187 - Im simply showing the tanks side by side. Notice almost all of its the same except right side of 33gal is extended and its vapor line is at the end where the blue cap is on the tank, so if you buy the tank only online, you need that hose for sure. That hose goes to the piggyback quick connect going to the fuel pump where the large line off that quick connect goes to end of canister closest to tank. Also notice the 2nd canister connection goes all the way down to past the blue cap, thats a hose you would also need clearly if you buy the tank separately, notice how it routes completely differently on the 26gal, thats also why on 8185 that vapor line is longer to connect to the end on the right side of the 26gal tank.
8188 - Mainly showing that the tanks are even on left side, yet you can see the canister on top one (33gal) is slightly farther to the left. So thats why the new vapor hose is probably needed.
8189 - Notice how the canister itself is slightly different, initially they look almost the same, but then notice how the 26gal one is V'ed towards the bottom, 33gal looks more straight, do i think you could get away with it, seems like it honestly. But I have no idea how its programmed if it needs this slightly larger canister for the larger fuel tank. Since I got it with the junkyard tank moot point for me. And I still suggest you all go that route vs trying to source all parts. Cause even with canister, you need then the mounting clips for it.
8190 - This shows that vapor hose that connects to the white end of the Canister. New one is on top with the white label on the hose, notice how its even at the end of the hose on the bottom left, but the actual bend on top left is lower/smaller on the one that came off the 26gal. Do I think this can be reused? Honestly? Yes. There is plenty of play on this and almost dont see why youd need this hose, it can clearly flex enough to fit this to new 33gal canister, or if you intend on reusing your canister, then obviously you dont need to get the hose as the hose is lined up for that canister.
")
Will do. Probably will be a little while though. Next couple weeks are pretty tied up.Was going to do mine this weekend and double checked this thread. Went and looked at my truck and it has no bracket either it’s a Laramie sport 4x4 with air ride. I looked up frame part numbers last night and appears it’s a different frame for the 33 gallon tank for both air ride and not and different wheelbase.
Let me know what you come up with to fab a bracket to hold that third strap.
the dealership and it cost me $2,138
if they do not fix it i plan on disputing it for they do not give me a rebate. I understand the Range was covered earlier but the steps and required bypass module is unclear. i was wondering if someone can provide me with bypass module and where to connect it.
I think it is covered earlier in this thread how to get the distance and read outs corrected. For that price I sure hope the dealer gets it fixed, otherwise I’d be asking for my money back! Good luck
if they do not fix it i plan on disputing it for they do not give me a rebate. I understand the Range was covered earlier but the steps and required bypass module is unclear. i was wondering if someone can provide me with bypass module and where to connect it.
if they do not fix it i plan on disputing it for they do not give me a rebate. I understand the Range was covered earlier but the steps and required bypass module is unclear. i was wondering if someone can provide me with bypass module and where to connect it.
 www.infotainment.com
Awesome, thanks for the infoThe bypass can be any bypass. Doesn’t need to be a specific one. Here is an example of one.
2018+ FCA Security Gateway Module Bypass Module
Beginning with model years 2018 and above Chrysler – Dodge- Jeep – RAM – Fiat vehicles are equipped with a new device called a security gateway module. The purpose of this module is to prevent CAN bus hacking over the 3G or LTE network. Infotainment.com alongside OBD Genie temporarily utilizes...
It plugs into two plugs on the top left of your OBDII port on the drivers side wall. There is a box there that two plugs must be removed and plugged into the bypass. It comes with instructions.
Other ones just modify the OBDII plug itself.
Sent from my iPhone using Tapatalk
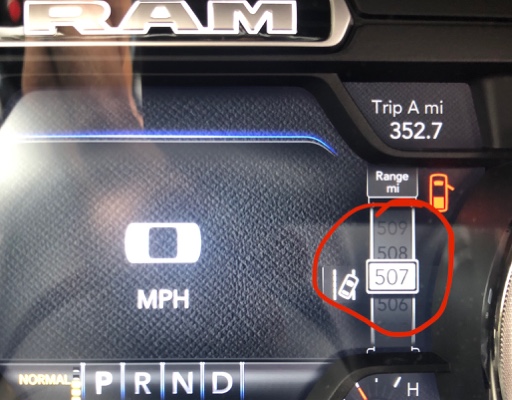
Would the cost have been less if you were upgrading from a 26gal to 33gal(additional brackets, sensors, harness, etc)?Hello All, I just wanted i recently purchased a 2020 ram and swapped out the 23 gal for a 33 gal i had this done at the dealership and it cost me $2,138 for parts,labor,tax. The fuel gauge seems to be working correctly but the Range for Fuel seems to be off. I tried working with the dealership and they say it is not possible as it is not in the drop down to be added. they claim they are reaching out to FCA engineers to see a possible fix but said there are no promises. i am not happy with the dealership but that is another topic. After searching I came here and noticed some posts regarding the alfaodb seems to correct this. I am trying find the easiest way to setup this up. i was wondering if anyone can provide me with insight. i know i need to obd2 connector and the alfaodb app from the google play store but i am not sure which bypass harness to get and i am not clear on where to connect it. Thanks in advance for all the help